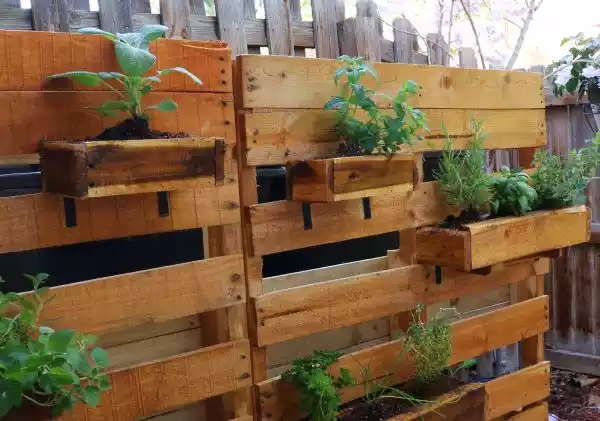
Growing your own garden can have many special incentives. Today we will show you how to build your very own Herb Garden! This DIY Pallet Herb Garden Project is fun, exciting, and environmentally friendly! Grab a pen and pad or print out these instructions! Get ready to Make an Herb Garden out of old Pallets!
1. Choosing a Pallet
a. Make sure that your pallet is heat treated and not fumigated with pesticides. This will harm your herbs if you intend to make an organic garden.
b. Aside from that, ensure the boards are in good condition, no nails sticking out, and the pallet is free of wood rot.
2. Materials
a. Pallet, 2 large bags of potting soil, 16 six packs of flowers, a small roll of landscape fabric, staple gun + staples, and sandpaper.
3. Wrapping the Back
a. First, use sand paper to smoothen out rough areas and nail down any loose boards.
b. Decide which side of the pallet will be the bottom. You will have to cover the bottom, back, and sides with landscape fabric so it’s important to keep this in mind when constructing your herb garden!
c. Lay the pallet face down and roll the landscape fabric over the back.
d. Cut two identically sized pieces that are long enough to go from the top edge of the back of the pallet and wrap all the way around to the bottom. Be generous and leave a couple extra inches for leeway.
e. Hold the two pieces of landscape fabric together as if they were one piece. Fold over the top edge by one inch and center it on the top board of the back of the pallet.
f. Stable the fabric into place near the top edge of the board.
g. Smooth the fabric out to the left and right and pull tight. Staple the fabric down on the top right edge of the top board. Repeat this step on the left side.
h. Fill in between these 3 staples with 1 staple every two inches along the top edge of the top board.
4. Wrap the Bottom
a. After you have attached landscaping fabric to the top and backboard. Smooth out the fabric to make sure it has a snug fit.
b. Repeat the process along the bottom edge of the bottom board, except don’t fold the fabric under. Instead, leave a long flap on the bottom.
5. Wrap the Front
a. Hold the fabric tightly along the bottom and fold the cut edge under. Staple the fabric down along the front edge of the bottom.
b. Smooth out the fabric from left to right and staple every two inches along the front edge of the bottom.
6. Wrap the Sides
a. Start near the bottom and begin folding the excess fabric inwards. Fold the cut edge of the fabric under and staple it down near the front, bottom edge, and sides.
b. Smooth fabric out and staple every two inches along the front edge of the side of the pallet. Ensure the fabric is tight but not so tight that it will tear.
c. Repeat on the other side.
7. Quality Control: Inspect Your Work
a. Now that your pallet has landscaping fabric wrapped around the sides, back, and bottom, place more staples along the spine of the back side of the pallet. Use sparingly and use good judgment to stable down any areas that you think will allow the soil to seep out. This is important because this is what will prevent waste soil and nutrients.
8. Planting your Herbs in Your New DIY Pallet Herb Garden

a. Planting will take place while the garden is lying flat on the ground, so lay the pallet down face up.
b. Slide the plants into what will be the top. Plant everything tightly.
c. Pour one bag of potting soil on the top of the pallet. Push the soil into the pallet between the slats and smoothen it out so that the soil is level.
d. Repeat with the second bag of potting soil.
e. Push potting soil into the bottom cavity so that there is a trench directly below on of the bottom openings.
f. Plant six plants in the trench tightly.
g. Repeat this step with the other bottom opening.
h. Push the potting soil up against these flowers to make a trench beneath one of the openings in the second row. Plant flowers tightly. Repeat these steps for all remaining openings until finished!
9. Completion
a. When you’re done, plants should completely cover every cover! This way, there won’t be any place for the soil to fall out. Make sure that soil is pressed firmly into every part of the pallet where you find openings.
10. One Final Bit of Advice!
a. Important: Leave the pallet on the ground for 2-3 weeks while watering your herb garden with the necessary nutrients! This step allows the roots to grow deeper to be strong enough to hold plants upright when you place the pallet.
b. If you lift it up too early, the soil will fall and compromise all of your hard work!
Still not satisfied with your outdoor arrangement? Enhance the instinctual, natural senses of your backyard and its resounding comfort with the best patio furniture online.

Cheryl is an award-winning landscape design consultant in San Diego, CA. She has over a decade of experience in the design world, working on both interior and exterior projects. She received her certification in design in 2010 and has contributed to the design of 7 separate furniture collections. Cheryl began lending her expertise to Patio Productions’ blog in 2012. When she’s not living in the furniture and design world, she’s busy playing with her dogs at home, or curling up with a cup of black coffee and a beautiful book on modern design. Her favorite patio furniture are her Acapulco Chairs in lightning blue.